Totaly Spies for Cobra - Plus Livestream

April 29, 2013


Did up this one of several orders in this theme I will be working on this week. Cartoon characters from other shows defecting to the ranks of Cobra! Here is Clover from Totally Spies in her new Cobra garb happy to be aboard! Check out the video of the making of this commission below. See you Wednesday, Thurs and Friday at 8pmEST at the EWG Livestream (click 'EWG LIVESTREAM' on the features menu) for a Harley Quinn on Wed, and more like this on Thurs and Fri! Enjoy the Livestream recordings. And thanks to those who came out. Especialy my awesome fan and client Cory for his ongoing support. Can always count on him :) Enjoy the video. I did two parts cause there was some issues in the middle, which leads me to believe thats why the first part video is corrupted but heres the second. Anyways, fun stuff. MAY do one again tomorrow night as well or might opt to spend the evening with my wife before she goes in to her next chemo. Depends on if shes sleepin or her and her mom are doin stuff. Alright, night!

 
Watch live streaming video from eryckwebbgraphicsart at livestream.com

Jumping Into A Busy Week

"Here I Go Again On My Own... Down The Only Road I've Ever Known...." (*cough* Whitesnake) - Here's to another great work week and capping off the month! My goals this week are completely getting contemporary on Ungrounded pages, Finishing lingering TMNT pages and Chickfighter pages and rocking socks on as many of everything else as possible! Go Go Go!
But also my schedule is shifting.

I really feel the importance and need lately, especially with the season and weather getting SO nice now, to spend as much time with my best friend and wife as much as possible! So will as much as possible be rocking my socks 8 hours a day and that's it. Now barring any sudden bouts of bleeding-out or depression or art block or drama or fuzzy bunnies this should not impact anything except for my balance in life. I work too much, and need to cut it back a bit and balance. Cause when you work too much, your days start running together and you start feeling like 'what the heck am I working for'. Not to mention, even if your doing what you love to do. You start not loving it. Its not fun. And I truly believe the work suffers.

So that being said, I will be trying to cap myself. With the continuation of Wed Livestream nights, and special occasions  I am self employed  and I must remember its OK to say, work in the morning, spend the afternoon with my wife getting her (and us both) out of the house and going to parks and site seeing and such, cause I can always work the other 4 hours in the evening when it gets dark. Being this is OH/PA weather, I think I can safely plan to do that on nice days, and work normal 9-5 on rainy/ cold days. Any-who, this is my general reevaluation of what I'm doing and where I'm intending to go.

As always, for now EWG is a one man show, and I've got everyone's orders and will update best I can on progress, even the 'order tracking' is really only once or twice a week. But no matter what, nothing slips through the cracks and I'm going for quality over quantity so you will get it and hopefully will be worth the wait every-time!
Have a great week, get lots done, see you at the drawing board!

This week's schedule:
Monday - Ungrounded / Other
Tues - Others
Wed - New Jumping Boy!
        - Ungrounded/ Other
        - Evening: EWG Livestream featuring Harley Quinn for Smash-face
Thurs - Others / Extra Character Art Livestream
Fri     - Ungrounded /  Other / Extra Character Art Livestream
The picture shown is this morning's warmup, a parody of JumpingBoy obviously. Just for silly-ness reasons!

End Of Week Note - New Setup Portrait Style Baby

April 26, 2013

Alrighty, got a new setup, heres a screenshot the white space is non existent, but i have portrait oriented monitor for my drawing space on left and on the right my horizontal dual monitor for palettes/ livestream window etc. Playing with doing full verticle livestream versus cropped horizontal, the cropped horizontal worked better. It'll only show a horizontal cropping of my work space but loving working verticle, everythings huge and way easier to work with now that i have the wacom / resolution mapping better and acting like it would if it was horizontal and still works great on livestream nights. Anywho. I'm digging it. Next is to setup my buttons on the wacom so I dont even need the keyboard and I can work fluid without worrying about the keyboard shortcuts. Stream lining/ adjusting for bigger better approach to the art. Well, who knows. May end up hating it and going back to verticle. But will try this out next week. I think its going to be good though. Have a fantastic weekend with friends family and/or loved ones and see you next week to tear up some new art. I can't believe May is on its way already. That being said, I promised a couple people to be all caught up or done by May 1st, and damnit I'm going to be! Count on it!

EWG Live Wednesday 4/24 Aftermath

April 25, 2013

Thanks to all who came out last-night  was a great Wed night live-stream  A bit unorthodox on my end as I was a half hour late and then had a half hour gap in the middle when had to talk with the other residence of this here household for a min and couldn't be helped. Then I took a break after the first two pieces and started struggling a little on the third one but I think they all came out great, had a lot of fun and totaled about an hour and half per piece working from 830pm-130am. Not too shabby! Heres the live-stream recordings from last-night  The first one of two chibi version of clients original characters and the second an elf/human adaptation of the my little pony character 'Princess Luna'. See the finished art below or on Deviant Art.

Man am I tired... haven't done one of those late night draw-a-thon sessions properly since, probably the fundraiser madness in March. But will head to the park, get some fresh coffee and a shower and tear it up today and tomorrow as usual! Excited to get a little performance upgrade on the ol' PC on Saturday  but mostly... just excited to have the weekend to visit with my fam on sat and get together with the wife's folks on Sunday  Hope the weather holds out and all in all looking forward to it. Been a looong work week!
Have a good Thurs and Friday of the week.


Watch live streaming video from eryckwebbgraphicsart at livestream.com


Watch live streaming video from eryckwebbgraphicsart at livestream.com

Skottie Young Digital Art Video

April 23, 2013

Found this outstanding condensed video of the master himself Skottie Young rocking it hard in Sketchbook pros with the pencils and inks. Inspiring stuff! Hope it inspires you too :) A good reminder to keep it loose, have fun, and practice everyday!
Or wait, is that the lead singer from AC/DC? LOL j/k.


Check out more of his stuff at:

Skottie Young YouTube - http://www.youtube.com/user/skottieart

Skottie Young Deviant Art - http://skottieyoung.deviantart.com/

A Thought About Manipulating My Work

*Read Update Notes Below
So, as a general policy. When you commission EWG, you are buying the art, the client gets the 300dpi file, but not the source file, with which they are free to do with as they please. Even says so on my invoices, 'yours to post, print, wallpaper or eat, whatever you want'. All I require is retaining credit for the hard work and ability for EWG to use it in promotional ways for the purpose of acquiring more commissions. Always in print or low-res file kind of ways there for never cheapening the client's own acquisition.

That being said, why in the same email, would you go 'holy cow great work!' and then also say 'i dont know how you feel about others tampering with your work.... BUT HERE I MESSED UP THE SCALE AND MADE IT LOOK SQUEEZED AND DISTORTED AND ALSO CHANGED THE COLOR SOME AND RE-POSITIONED THEM TOGETHER HOW DO THEY LOOK NOW!?'.

If you pay for the commissioned work, and don't even ask me for changes, why did you mess it up? Ugh. Makes me regret putting so much into it if the person is just going to screw it up like that. 

My first response was to be like 'yeah fine whatever you want'. Then it sorta started eating at me.  So if you take work I did, that came out perfectly fine, and "...make the girls less thick" (which is absurd  I draw fine looking ladies thank you very much) by squeezing the horizontal scale and completely blow out the scale and proportion of the whole figure and call it 'improved'. Thats your business. But I do not want credit for it. Please make sure, if you manipulate my finished work, that credit for the original piece goes to me but that you slap a big ol sticker on it that you tinkered-the-holy-hell out of it because I don't want people seeing the EWG logo/signature on it and thinking that EWG did that. It didn't look HORRIBLE, but it wasn't good either. And my issue, in closing, lies in this:

Okay, you can mess with the finished art you bought all you want. But are you posting that up with my logo on it? Are you crediting me to the version you end up with? Or you removing the logo and claming the work as your own? Where is the line between what should and shouldn't be credited to me, and how is the general public or others supposed to tell the difference?

Perhaps I'm over thinking this? He can edit and use it as he wishes I suppose I just don't see where the line is. Where is it? I can't see it? *Squint*.

So maybe, in conclusion... my diagnosis of this problem is. Please just don't. Leave the art alone, the way I made it, or ask me for changes. Otherwise, its just not my work. And all that time I spent on it was for nothing, because I don't want my logo on it anymore.

*Update Several Hours Later: Thanks to all who have read the article here/ on the EWG website, my original intention is to create a thought process in readers about where the line is between work that's the artist's and at what point its not acceptible for work manipulated by others to have your logo on it. I have edited the article to better drive home the point and make it less about dissing the client, who I realize was just experimenting learning/ playing with the piece. Infact, as it says in any 'fine print' of a EWG invoice or contract the finished hires art is for the client to print, post, use for toilet paper whatever they want. But, all that is allowed as long as they do it without altering it. If they start altering it, at what point should the logo not be on it, or at what point should it still be on there. This is the gray area I find most confusing. THX for reading, now back to the original article, though it has been revised a bit.

Artemis - An EWG Character Art Breakdown

April 20, 2013

 Well, I had a chance today on this balmy Saturday of snow wind and sunshine to throw up a new article post in the process section. Here's a breakdown of the Artemis piece i did last-night on Livestream and also the video posted down at the end. Check it out. Also presenting the finished version as the original line-art including version and then the super graphic spectacular line-art-less version which is more and more a style I am toying with these days. It works best if you have super crisp and exact flats to base all your shades and everything off of. If you do the flats on the mark then everything else works out great. Any-who  Enjoy this tutorial so to speak of the process of this piece. Though it doesn't get into a ton of details, I try to point out the key steps involved. So this post features the personal (in-house) artwork of the EWG produced webcomic series 'JumpingBoy'. In this case, the first time doing a proper full color illustration of Marty, or as she obviously is also known according to this piece, Artemis. Enjoy!


1. Sketch and Pencils - Penciled loosely at 150 dpi which makes it easier to sketch and have it zoomed out enough to see the full form, no resolution issues getting in the way. Adjusted the gestural sketch several times. Right off the bat knew what I wanted out of the face, shoulders arms and hands but the torso and legs changed around 3 or 4 times before I settled on this. Goes from 'bouncing back stance' to 'coming at you' charging. About to cream somebody with those gauntlets  So sketching lightly with brush transparency set to stylus pressure I get it down, then start going over with heavier pressure and really defining the shapes and details enough to ink over. Still lots will be modified on the fly while inking.

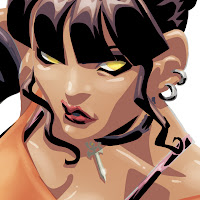
2. Inking Line-art and Black Fills - Here we have the finished inks. I bumped the pencils up to my usual 300 dpi and zoomed in 300-400 percent and with a slow steady hand traced out the contour lines of all the parts with some variation in line width indicating folds or wrinkles in the gauntlets or pants or shirt what have you. I find turning a piece sideways to do long vertical lines helps. I can do fast accurate and smooth lines better side to side than up and down. Could just be me. I don't know why really but that's why I do it. Then after that, I merged a full white layer with the black lines. Adjusted the contrast so there's nothing but white and nothing but black. Selected all the white area and deleted it. Then used -100 lighten in the hue/saturation panel to make everything a hard black. Then in a new layer above used the pen tool with 'auto fill shape color' set instead of the other one which is the empty pen lines, set this layer to low opacity and traced out the black fills. In this step I accent a lot of the depth, depicting what areas are hit with light what areas don't get line and definite the mass of the character and her various parts. The hair is sort of a stylized approach showing where light hits and also I filled in her eyebrows, eyelashes and other areas. My general rule (that admittedly I sometimes forget) is hard shadows define inanimate objects or man-made materials such as clothing, jewelry or weapons. But I usually refrain from hard-shadows on human skin or non-hairy areas. Just aesthetically more pleasing when colored IMHO! Also another rule is if something is hard, fabricated or mechanical or otherwise structural, use straight rules and ellipse tools to do crisp lines. Or pen tool for curved things like robot parts or body armor or weapons. I then free hand clothing, hair and organic stuff or malleable objects. Separates the artificial from the organic in a simulated tactile kind of way. Anyways just another general rule. So when you get your black filled areas you DEFINITELY want black all placed on. Drop the layer back to 100% opacity. Make sure there's a white layer below the inks layers that hides all the pencils and stuff below it.

3. Color Outline and Shadows - This is a screenshot I took whilst working on it and posted to facebook. But I basicaly do a layer under the inks layer with the pen tool on 'auto fill selection' again but I pick a light gray and select the entire area of the character or object. Then I shade over this part by doing the same thing on a layer above it, but dropping the opacity like with the black fills. This will be the shadows of the character. So I think about areas where the light drops out but wouldn't necessarily be full black fill.  Also bending the reality of lighting a little bit to help add more mass and definte more shapes and curves in fabric and hair and what not. The shades are best done over a single light color that is not distracting, cause in the long run there is a definite difference in shading over one light color instead of adding the different flat colors of each part of the character, and THEN shading. Shading on the one color allows you to focus more on the mass of the character, and how light hits the entire figure as a shape in space. When theres many different colors the natural tendency is to shade with consideration to what color your on at a given time and only look at a part at a time. With one color, you shade the entire figure as a whole. Trust me you may not even realize your doing it one way or the other but it happens.
You can shade relatively loose as far as letting the shades go outside of the figure you outlined in gray before, especialy to move around the figure faster. Because once you get it all shaded how you want. You can rasterize that shade layer (get rid of the vector/pentool effect) (right click - rasterize layer) and then select the gray layer (ctrl click on the gray outlined layer) and then go select-inverse and delete the excess shades on the shadow layer. Now it all conforms nicely in the gray figure shape. From here we go onto highlights

4. Highlights Flat Colors and Final Notes - Do the Ctrl-Click on the shades layer you just finished with, now go select-inverse, it should now select everything except for those shades, including areas of the gray outline color of the character, the lineart and yada yada. Now go to the gray color layer, and use the magic wand set to 'continguous' so it selects all similar areas, and click outside the gray figure area. It will now only have the areas that aren't shaded but are in the gray color area selected. Grab the airbrush, set to about 30-40 opacity or pressure and select white, make sure you make a new layer above the shadow layer for 'highlights' - and just carefuly using light pressure on the stylus go over areas you want light to drop upon, letting it fade out towards the shadows. Do this in different areas keeping in mind how the black fills and shadows are definiing the light already now your accenting it with contrasting highlights. When you highlight areas enough to be happy, deselect, and then play with the layers settings of either overlay or soft light. And the opacity level. For a nice hiehlight effect. If you did it right you left areas between the highlights and the shadows untouched so it has a rendered effect where its normal in the middle, highlighted on one side of any egiven area and the hard shadows on the other side. 
Then, you can add harder spot highlights to the ones you just created for areas where there would definitely be a hard shine or such. Use the pentool with color fill and white and select the top-most point where light would hit in the highlight airbrushing you just did. That gives more of a sharp spot of light to round off the rendered look. I sometimes go overboard and put these hard spotlights on about everything... you can do that. But in exercise in restraint, I try to save them for shiny things only like leather, metal or skin or hair or plastic or glass.  Then on that gray layer I went back and selected her hair, made it the color its supposed to be, selected her skin, made it as south-american-heritage as I could, selected her shirt made it orange, selected her pants made them olive/sandy, selected the gauntlet metal made it a brassy silver, made the gauntlet a leathery look. This can be done by turning the highlight and shade layers off, then once you get the flat colors all done on the (what was the gray outline area) turn the highlights and shades back on to see the whole thing come together. So basicaly, except for a few modified variations on the steps I just discussed, here you go with the final piece below! I added some type and a background. I also went to 'layer' 'layer settings' and added a white stroke to the base colors.
I also selected the line-art layer, and added a layer mask by clicking the button on the layers palette with a circle on it. Don't have anything selected when you do this though. Then I took a brush with black color and took away line-art details that I thought would help make the art a little more sleek. I took away some detail on her nose, and around her pants and the shirt. Just to make it a little more aesthetic. And the beauty of the mask, if I decide 'no i want those there' then i can change color to white and just unmask color them back in. 


As a later variation, when the outlining of the character is done well and the flat colors, shades and highlights are all left on but you turn off the line-art layer... you get this cool unlined looking illustration with a serious graphic rendered feel to it. Its an experimental style I've been playing with over the last year or two, I'm sure others do it but its new for me at least! There's pros and cons. But always pretty powerful. 
I guess this ended up being more tutorial-like than I originally anticipated. I hope it was informative, easy to understand and if anything somebody out there learned something! If not just enjoyed the breakdown of my general working process. At some point I'll do an official tutorial rather than a 'look at the general steps'. Where I have screenshots of selections, menu items and full break downs. That'll be for another time though. I imagine that'll take a while to compile. 

But for now, you can check out the full Livestream for this piece, which will show what I wrote above from sketchy sketch to finished Marty goodness. 
Enjoy and thanks for reading/ viewing!


Trent Kanuiga - Swordsmen Digital Concept Art For Study/ Inspiration

April 19, 2013


Alright, well I do believe this is the first of my 'reference' section of the site. Stockpiling resources, inspiring videos or videos that make good study material. Useful texture sites, vector and other item sites. Features of that sort. So you'll now see a 'reference' label on the right and bottom menu of this site. Click it to check out what will be an ever accumulating stockpile of useful tutorials, demonstrational videos and resource links and reviews of stuff that has helped me out on various EWG client and personal works! Starting it off is one of many awesome digital art demonstrations by Trent Kanuiga on youtube, he does the art presents the video spead up a little bit and records audio commentary over top. Very inspiring! Hes come a long way since his 1995 work Creed and his Ghost Rider work. Check out his latest illustration work and work on his webcomic 'Twighlight Monk'.

Trent Kanuiga DeviantArt

Trent Kanuiga Youtube

Trent Kanuiga's Twighlight Monk

Have a good end to the week!

April 18, 2013

Thanks to those who came out hung out today during the ol' 9-5 workday. Was a lotta fun. Funny that I ran out to spend some time with the wife and dog at the park and then realized we needed gas after the park so on way to the gas station ran out of gas and had to get rescued by the ma in law and a can of the neighbors gas. But then made it back an hour later than I thought we would and got lots more done anyway! Was a very good work day actually  Best in a long time. But I'm ready for the rain to hit tomorrow and the new UPS I have obtained from a private EWG investor will help very well during the thunderstorm we're supposed to get tomorrow. Rainy day means workin away at the ol' EWG studio! I find myself with an hour or so of free time tonight, but I think I'll dilly dally around on some Facebook games and go to bed. Got a long day of page work to do tomorrow and still want to squeeze in a character design or two. Been a good week. Heres to more this and that. Will be doing about one spring sale commish a day till done, and wed night next week will do a bunch live on the stream. So maybe I'll see you out there then. Goodnight and have a great weekend!

EWG Live All Day

Chibi done during lastnight's 'Spring Sale' livestream
Thanks to all the awesome folks who were out enjoying the livestream lastnight. I'm working on 5-6 individual projects today and thought it'd be fun to have livestream on all day broadcasting (not recording) feel free to peek in on the inner workings of EWG at any point today. from 9-5. http://t.co/HKgYm3BSnI (or click 'EWG Livestream' on right)

Will be doing
vector transformers art
vector cartoon graphic
3 illustration proof pencils

Colosso and Dana Alt - Ss Commish Process

April 17, 2013

Pencil sketch at lower resolution. Rendered them as far as I felt was needed to take them to finished inks


Ink lines and fills and basic shades together on one canvas at full resolotuion

The colored versions (they were done on the same canvas but here they are with the added highlights and everything else)
And the live-stream video of the whole session below. As a contrast to Monday night, I definitely had a good flow and speed going in the penciling stage and worked on two at once with no problems the inks gave me a little trouble especially with the one character who was very complicated but still fun to do. In general happy with how they came out. The cocky giant sized super hero and the witch-blade type alt transformed version of a clients super hero!
Good stuff!

 
Watch live streaming video from eryckwebbgraphicsart at livestream.com

Baron Power - The Process Video

April 16, 2013

See the finished artwork in the EWG DeviantArt Gallery
Well came back from the weekend pretty rusty (stiff?) but I feel like I kept going till I got there and worked the kinks out of the ol' drawing hand once again. Check out this live-stream video of the process, feel free to skip through some of the lulling parts and an intermission in the middle while helping my wife with her night-stuff. The idea for this was a doom-like character in a doom-like stance with the world being crushed in his hands. The idea may have been lost in the amount of cracks and fissures glowing on the globe that make you think its just some sort of power ball rather than a imploding planet being crushed between his hands. But overall think it works well.
In the video below you can observe my process experimenting with many stick figure sketches for composition, starting to take it to finished pencils a couple times and not happy with the angle or the impact of the pose so i move it around a couple times till you get the result of the final piece. And then study the process and the tools used from pencil sketch to finished work.  I usually do as much as possible by hand but this fellow had a lot of technical lines in his armor and such so I used the pen tool and then stroked the path with the brush following the pen tool path. Then some areas I wanted more emphasis and line-weight on so I went over them again with the brush tool by hand. From there filled blacks adding more mass and colored and shaded and highlighted and added effects. Again, see the final work in the EWG Deviant Art Gallery; and check out the process in the live-stream video below.


Watch live streaming video from eryckwebbgraphicsart at livestream.com

Cowbotkey Tee Graphic - Step by Step

April 9, 2013

So here's a look at my mockups for the finished shirt, thanks to GoMedia and their satellite site ShirtMockup.com . Looks pretty wicked! I had a lot of fun with this one, and thought it might be even more fun to show the steps involved. This one went pretty quick, and my vision was pretty clear for it, so I went straight to a color sketch!

I drew this out and layed down some simple colors, then sent the approval sketch to the client, who almost immediatly said 'YES PLEASE.'

I got some proofs done lastnight and decided, that monkey would be lots of fun so I wanted to get working on it right away. I started by importing the photoshop jpg into inkscape, where i set it on opacity locked the layer, and made a 'inks' layer above and got to work. i used my wacom pen and hand brush inked all the lines. The beauty of this is it looks hand drawn but is 100% vector!


Then added a new layer so it doesn't conflict/ mess with the lineart layer i was happy with and i added in black fills and shadows to give it more mass and depth.

A layer underthat is where I traced out the different color areas one by one with a pen tool, again everythings vector here!

Then I made a 'shades' layer and used black and added shadows in various areas, then dropped back to opacity about 50%

And theres something about an image, its just not done till you go back in with whites or highlights and really play off the shadows with areas of spotlights. And it just brought the monkey alive to add a little psychotic light swirl in them beady red eyes.
***
And here is the finished art minus a drop shadow. The dropshadow I ended up putting under the monkey helps ground it to the shirt its printed on. I gave the client two files. One with a lighter shadow for lighter shirts (allowing the monkey better contrast against the shadow) and a darker shadow version for darker shirts (so the shadows there but not competing with the monkey)

Hope you enjoyed this look at the process of a Tshirt graphic! Feel free to comment below I always like hearing feedback on how I'm doing or what I could be doing different! 
Thanks!

See how the lighter drop shadow competes with the black shirt? Though I kinda dig it in any case :) 


Spring Sale is over, Also Have A Great Week!

April 7, 2013


Thats it, the Spring Sale is over. Thanks for all the orders from those who took advantage. Sorry to those who didn't and were looking to get one. Stay tuned to EWG Deviant Art, Facebook or Twitter for new promotions in coming months. Well, that is that. EWG remains available daily for any of the regularly offeredi tems on the EWG pricelist located at that link or on Deviant Art. Thank you! Will get everyone their orders by end of the month! And heres to another great week of commission artwork and whatever it is you do for a daily living. Have a great week and see you Wednesday night for EWG Wednesday Livestream!

Sunday is Last Day of Spring Sale

April 6, 2013

Hop on the SPRING SALE while its available. Commissions like the first two received orders above usualy cost 45.00, right now they're on sale for 30.00 each. The one with Two Characters in one canvas you save even more! Chibi orders, cute stumpy personifications of customers requested characters, are only available in this Sale, and not regularly offered! They're only $15! So click the 'Spring Sale' banner at the top right of this site or click the link below to head to the EWG Paypal shopping cart and order as many or as little as you want. That is the only place you can purchase this sale and that shopping cart will be taken down as of midnight Sunday. You have till then. Wait, thats only 24 hours?! Aw snap!


Also, check out this Livestream video from Fridays session where I drew these two orders up! Two orders in 3 hours, not bad!


Watch live streaming video from eryckwebbgraphicsart at livestream.com

Rarity + Warmup Sketch 4/4/13

April 4, 2013

Tonights commission done on Livestream

The 15 min warmup I did before hand on Livestream

Had a blast. I chowed down on lots of spaghetti for dinner and that with some strong coffee had me in a zone artin like a mad man tonight. I really had fun, been several weeks since I had that feeling back. Hope it stays around for a while this time. Note to self, I do a lot better if I carbo-load before a major art session. Sort of a vicious cycle between that helping and the fact that i'm sitting on my arse all day/ night to draw and work. I'm sure the combination will backfire on me in the form of epic augmentation o the arse. But ah well. Worked for tonight at least!

The Rarity full color pic is a perfect example of a Full Color/ Finishes over Pencil Sketch. Note the more whimsicle lines and rougher sketchy style. Inked art which is a few bucks more is clean digital-brush inked lines and no scratchy scratch. I'm kinda fond of the scratchy scratch though. Neat aesthetic. Anywho! This might be last MyLittlePony elf commish I do for a while so wanted to knock it out of the park. I LOVE doing those magic effects and motion trails.

Below is the Livestream Video! Featuring the warmup first, then burning up the wacom with this smokin hot Rarity rendition! Enjoy! Tonights Livestream fueled by (spaghetti and coffee) Deadmau5 - Meowington Hax Tour Toronto 2011


First Live Request Sketch Night A Success

April 3, 2013

Saria Linde as French Maid


For Gabby K/O Cory
Star Wars Clone Wars Ahsoka

For AnonAmon
Marionette OC

These are the three live requests I did tonight on '$15 sketch liverequest night'. 
Was a lotta fun. I think I could have done more and come up with cooler stuff if I didnt have a migraine type headache dogging me all day/ evening. But I'm happy with the average of 10 viewers hanging out tonight and the people who threw down some fun requests. 

Will make it a regular thing :) Maybe sometimes just quick ink sketches or other such things. Tonight was digital pencil sketches, which I indulged with some 'inkwash fills'.

Fun stuff. But thats it for tonight. I will be firing up Livestream 8pm tomorrow and Friday. Tomorrow will be full color Saria Linde as a mylittlepony character, and whatever I decided to do (if anything) after that. Friday will be 8-midnight non-stop Spring Sale orders live! See how many I can knock out. 

Goodnight!

The Rest Of This Week At A Glance

Just a update/report on the schedule/ outlook for rest of the week till the weekend.
Priority is on my main project right now, Ungrounded continues till its finished up this week.
I have no choice but to make everything else secondary. The special items this week are:

-I Am Looking To Raise Money specifically for hospital bills whilst my wife is away in Pittsburgh getting her monthly chemo. So I am holding a week long fundraiser.

-Tonight 8pmEST - 12amEST am holding a Livestream session where I'll take live $15 sketch requests. Order during the event only. Digital Pencils very much in the style of my daily 'gray area' style warmups. Hope to see people out for that here in a few hours.

-Thursday will be doing LIVESTREAM production on a mylittleponies/ elf/human piece per customers request

-Friday, on Livestream, will be the only night I will broadcast production on as many SPRING SALE Commissions as possible. Come out see it Live. I invite people who have purchased orders by then to come sit in on the art goodness, will do as many as possible but the outlook is most likely 4-6 orders max.

And thats the plan this week.


Spring Sale Fundraiser Day 3 - New Flyer


In February, I held a three night Livestream fundraiser to raise extra money for hospital bills accumulated whilst my wife does chemo. See If i couldn't offset the hospital visit cost a bit. This was a massive success, and I thank everyone involved in that. 

Here in April, I'm doing the same, but based on the public's votes, the interest was more towards a week long offering of the same prices, though it won't all be done on livestream. 

An e-commerce purchase location for this special has been set up on the EWG website, choose which items you want, mix match, decide the quantity of your order, and pay securely with paypal. 

Help my wife and I get a few steps closer to being out of medical debt. Shes worth it, and the art your getting will be too. 

PURCHASE At http://eryckwebb.blogspot.com - all week, sale ends April 8th 12:00amEST. Thank you in advance! 

Jump On The Spring Sale!

April 2, 2013

Today's Warmup, featuring everyones favorite Jumping dude. This piece as well as this post serves two purposes. 
  1. This is an example of a EWG Chibi Character Art Commission (texture doesn't necessarily apply but can) which is one of 4 options in the weeklong SPRING SALE going on now! This as you see it is only $15 bucks! A piece with two chibi characteres is only $25! A savings of over $10 dollars off normal price. The 'normal character' options are saving upwards of $20 off normal price.
  2. Also want to announce that today's NEW Jumping Boy is up and ready to read! And stay tuned for another new page on Thursday!


EWG SPRING SALE has LAUNCHED!

April 1, 2013


EryckWebbGraphics is happy to release the Spring Special, a 'people's choice' special. This was one of three options for an April special that was voted on during the second half of March, and the people have spoken. Instead of a 3 day Livestream Fundraiser, EWG is launching this week long availability of the special offer. All orders will take 3-4 weeks to complete, but the prices will only be available from April 1st - April 8th.
Its exciting to be able to present a special that fans and customer specificity asked for, and I look forward to   diving into the orders to come. If it does well and people's response to this event and final product over all it will most likely happen again! But there's no telling, only time will tell!

 
EryckWebbGraphics © 2013 | Base Template Designed by RumahDijual, in collaboration with Online Casino, Uncharted 3 and MW3 Forum
Design Modified and Adapted for Eryck Webb Graphics Website by Eryck Webb.